

Features
How To Find An Ideal Weed Cart For Your Weekend Getaway In Canada?

Are You planning to take a trip to Canada this weekend? Canada has emerged as a great vacation place for cannabis lovers. Not only is cannabis fully legal, but also finding
Weed Carts that suits one’s style has never been easier or more enjoyable. And yes, while on the journey to get one, a million questions come to mind, like what the best option is, what would suit the trip best, etc. Well, you’re in the right place because, in this article, we will discuss all the details of top-quality weed carts and how to select the best one for your weekend without running out of ideas on flavors, potency, or even brands.
What Is A Perfect Mix For A Weed Cart? Let Us Find Out!
When choosing the best weed cart for your trip, don’t just walk into a store and pick one off the shelf. Several elements, such as strength or potency, strain variety, and flavor, need to all fall into place when creating a great experience. Here’s what you need to know:
- Potency: Choose a potency level based on how sensitive you are to cannabis. For instance, consumers can try lower THC levels for an easy ride or stronger levels for more experienced users.
- Flavor Profile: There are weed carts with fruity, earthy, minty, and other flavors. Finding a flavor that suits you can greatly improve your enjoyment, as you can tailor your taste.
- Strain Selection: Would you like an energizing Sativa, a more sedating Indica, or an even Hybrid? Depending on your planned weekend, this will change how you feel, so it is important.
Exploring Weed Cart Varieties: Choose Your Vibe
Since different carts have different effects, picking the right one might prepare you for the weekend. Here’s a breakdown of strain types and what each might bring to your adventure:
1. Sativa Carts for Outdoor Enthusiasts
If you plan on being out and about over the weekend, sativa strains are great as they can be quite energizing. Most people love sativa carts because they are invigorating and can motivate a person to be more creative.
2. Indica Carts for that Delightful Escape
For those who want to completely relax, I would recommend an Indica cart without any doubts. Strains labeled Indicas are generally said to be more relaxing and weighted, ideal for winding down after a long and exhausting day.
3. Hybrid Carts for a Relaxed but Active Weekend
Hybrid strains are the in-between, providing both the euphoric high and the calming low. This strain is best used on weekends full of diverse activities. Hybrids are versatile and can be tailored in strength and previous effects making it easy to find a hybrid perfect for you.

How to Choose Good Quality Weed Carts?
Some marijuana carts are made of better quality materials than others, and it’s always a great idea to go for the best to ensure better results. This is how to select the best weed carts:
1. The Ingredients Should Be Organic
Organic weed carts are the best since many pesticides, heavy metals, and other nasty elements are not used in manufacturing these carts, which are detrimental to one’s wellness. The flavor of organic weed carts is often stronger. These types of carts are best labeled with either organic certification or third-party endorsement.
2. Proof that the Product Has Been Lab Tested
Most trustworthy brands are very transparent. They even provide QR codes you can scan to take you to lab testing reports. These reports are about transparency and show proof that the product is absent of any such contaminants and that its potency is as advertised.
3. How well the Cart Hardware is Designed and Put Together
To experience the best vape, quality hardware should be of the utmost importance. The heating components should be ceramic as these create vapor that is cleaner and the oil remains unburned. Disregard carts whose components are made of plastic as they are prone to degradation which spoils the taste.
Choosing the Right Flavor for Your Vacation
Flavoring can enhance the experience of using a vape or vaping products. You may consider the following flavor profiles depending on your preferences and the nature of the weekend getaway you intend to have:
1. Fruity Flavors for Summer Trips
If you have planned beach holidays or sunny hikes, fruity flavors like mango kush, Pineapple Express, or Strawberry Cough can be a great addition to your experience. Such flavors are usually mild and easy to make, which makes them quite suitable for outdoor activities.
2. OG Kush and Sour Diesel for Tree Huggers
For a trip centered around nature and involving a lot of time spent in the woods or the mountains, opt for OG Kush or Sour Diesel due to their earthy flavors. These carts give off a very pleasant flavor that makes you feel at home and fits the theme of your trip.
3. Lemon Haze and Peppermint Patty
Should you find yourself in urban cities or simply want something that is not too overpowering, minty or citrus flavors would be a safe option. These carts make the most sense when on a city break or in the chilly months, as they are refreshing and elegant.

Assessing the price and the value
People often emphasize price, but higher price tags should be scrutinized. Here are tips on how to find high value for your money:
- Look for Good Brands: Search for alternative brands and examine their lab analyses and reviews from other consumers. Most of the time, there appear to be two or three mid-priced, superior-quality items.
- Buy in Bulk: For those who will be away for a longer period, bulk purchases or multi-carton packs can be economical.
- Check for Promotions and Coupons: Some dispensaries may offer special offers to first-time clients on certain days. If you are going to a new place, find out in advance to avoid missing these offers.
Conclusion
Going out on a weekend has never been easier with Canada’s active cannabis culture and several high-quality weed carts for those looking to get away and have a good time. Use the cartridge that best suits you, from the strain type to the taste and strength. As long as you have the right $ product and plan things in a certain way, the weekend is poised to be filled with unforgettable moments of peace, adventure, and astonishing encounters.
Features
How to read fixed, daily, and progressive jackpot labels at Betscore Casino

Modern casino lobbies feature distinctive jackpot tags designed for easy recognition across various game tiles. Browsing through Bet Score, you will see that the platform uses a consistent system to present fixed, daily, and progressive jackpot displays. This brief guide explains how these labels are typically formatted, offering visual cues so you can confidently interpret each jackpot category. Betscore Casino presents these markers in a clear and recognizable way.
Across the lobby, jackpot labels act as immediate visual indicators that separate one game’s prize structure from another. These tags use bold text, simple icons, and standard placements, which makes scanning for your preferred jackpot type quick and intuitive. While game tiles may share basic design language, the wording on a label—along with visual styling such as meters or timers—lets you know at a glance whether a jackpot is static, day-specific, or incrementally building. Familiarizing yourself with these UI elements helps you compare options in Betscore Casino without clicking through each game panel. Understanding the visual symbolism of these badges saves time and keeps your focus on how casino interfaces communicate essential details about their jackpot mechanics.
Decoding fixed and daily jackpot displays in casino lobbies
When you spot a “Fixed” jackpot label in the lobby, it indicates a set prize amount displayed the same way every time you encounter it. This number stays constant, appearing directly on the game’s tile or badge and often repeating on the game’s detail page, to minimize ambiguity. The layout generally favors a clean, uncluttered presentation, with the static number supported by an icon or highlighted term that reinforces its status as unchanging. In Betscore Casino, these design choices create a straightforward reading experience where the fixed amount sits front-and-center beside the badge, making it easy to identify among multiple game tiles.
For “Daily” jackpot displays, the interface uses visual cues to highlight the time-based nature of the prize. You’ll often see the jackpot label paired with a reference to days or a timer-style icon, sometimes in the form of a calendar symbol or a clearly defined time window. These elements are usually grouped with the label and placed at the top or side of the tile so you can instantly tell that the jackpot is awarded on a daily basis. The combination of wording and visual accompaniments ensures that the daily structure stands out. This consistent tagging makes daily jackpots particularly easy to sort when scanning the available offerings.
How progressive jackpot meters stand apart and quick display checks
Within the lobby, “Progressive” jackpot labels are closely linked with animated or meter-style visual treatments. The jackpot amount is shown as an ever-increasing figure, typically larger or highlighted in a contrasting color, to draw attention to its dynamic nature. Often, the progressive badge sits beside or above this meter, so the relationship between label and rolling number is obvious and direct. In Betscore Casino, this design philosophy visually distinguishes progressive jackpots from fixed or daily options at a glance, creating an immediate sense of anticipation around the changing prize amount each time you browse the lobby.
When identifying jackpot types quickly, three main cues make reading the tags straightforward. Fixed jackpots always feature a stable, non-animated number next to their badge, keeping things simple and clear. Daily jackpots consistently add a day-based timeframe indicator, which could be text or a countdown, usually positioned close to the label for easy association. Progressive jackpots, by contrast, are marked by a running total or animated meter, making them stand out as prize amounts increase. Paying attention to these conventions, you’ll find it much easier to compare options and navigate the jackpot categories provided with confidence and efficiency.
Features
Some random thoughts on the AMIA bombing, Operation Solomon, Arab migration to Palestine, and Jeffrey Epstein

By BERNIE BELLAN When I received an email from an Ethiopian Jew who is now living in Winnipeg who reminded me of the incredible efforts made by so many different people to help rescue Ethiopia’s Jewish population and bring them to Israel during Operation Solomon in 1991 (Operation Solomon) I began to ask myself why that particular event doesn’t get paid more attention within our own Jewish community here?
Recently our community held another commemoration of the AMIA bombing in 1994 in Buenos Aires, which claimed the lives of 85 people (not all Jewish) and injured over 300. Each year B’nai Brith holds a solemn ceremony during which 85 candles are lit and the names of the deceased are read out.
Yes, that was a horrific tragedy, but I wonder how much it still resonates with people. There have been so many other horrible events since that AMIA bombing, including of course the massacre of October 7, but more recently there was also the Bondi Beach attack in Australia last December, during which 15 people were killed and 40 injured. Are we also going to have commemorative events held here in Winnipeg going forward to mark that particular event?
Compare the solemnity with which tragic events such as the AMIA bombing and the October 7 massacre are remembered with the total lack of celebration of something that should be as uplifting as was Operation Solomon. Could it be because Operation Solomon happened in far away Africa and the people who were rescued were black – and seemed so foreign to those of us who can even remember what happened in 1991? I don’t know whether there’s an element of racism involved in the lack of recognition anywhere of Operation Solomon, but I thought it most interesting when I was rereading articles in The Jewish Post & News written by the one individual in our Jewish community who did more to help in the rescue of Ethiopian Jews than anyone else – the late Elliot Levine, and Levine noted the total lack of support from the Winnipeg Jewish Community Council for what was known as “The Committee for Ethiopian Jews,” I couldn’t help but wonder how much race has played a part in sidelining Operation Solomon as a momentous event in the recent history of the Jewish people.
When one considers how much attention is paid to the AMIA bombing, which affected people who, simply put, look more like us, to the lack of attention paid to Operation Solomon – well, I think you get my point.
The Ethiopian Jewish community now living in Israel has had a difficult time being accepted by mainstream Israelis, but over the years many members of that community have made significant contributions to Israeli society and the more recent descendants of the original Jews who were brought to Israel are now proud Israelis. It would be nice for our own community to hold some sort of event to mark Operation Solomon, since it is now the 35th year since that momentous achievement occurred.
Speaking of past achievements, the furor over the Nakba exhibit at the Canadian Museum for Human Rights has continued to spark heated discussion. I’ve received a number of emails from various members of our community responding to articles I’ve written about the Nakba exhibit (and in some cases articles written by others that have appeared in the Jewish Post). I don’t mind admitting that I’m not at all sure where I stand on the whole issue of the Nakba exhibit. I can see the merits of arguments that have been made on both sides of the issue and I try to keep an open mind as I hear different perspectives. But, no matter what argument is being made, I encourage everyone to listen to what people have to say and think carefully about the pros and cons of the particular points being made.
As I noted in an earlier column, rather than descending into an argument over which group has a more valid reason to feel aggrieved – Palestinians who were forced to leave their homes in Palestine (and I’m not going to debate whether the majority left willingly or not; that’s an issue that will never be resolved to anyone’s satisfaction) or Jews who were forced to leave their homes in Arab lands, I’d rather concentrate on thinking about where can we go from here?
Unfortunately, the clear consensus in Israel now seems to be that there can never be a Palestinian state and even those politicians who might have been willing to enter into at least some sort of discussion about the possible creation of a Palestinian state have moved so far to the right – in response to the clear shift in public opinion in Israel that sees no room for even contemplating a Palestinian state, that the issue of a future Palestinian state has been completely taken off the table.
At the same time though, as much as I’m generally sympathetic to the Palestinian aspiration to have a state of their own, just as I prefer to refer to historical evidence when it comes to debating what actually happened during the “Nakba,” I also like to look at the evidence surrounding just how many true Palestinians there are.
By that, I mean how many people who call themselves Palestinians can trace their roots back to the actual land which can be referred to as “Palestine.” Remember that there was no such thing as “Palestine” per se until the British Mandate over Palestine began officially in 1923. Prior to that what we now regard as “Palestine” was simply part of the Ottoman Empire.
According to figures compiled by one of the pre-eminent experts on demographic in the Ottoman Empire, Professor Justin McCarthy, there were approximately 500,000 Arabs in what is referred to as Palestine at the turn of the 20th Century, while there were approximately 23,000 Jews.
By 1945 the Arab population of Palestine had grown by over 600,000 to approximately 1,100,000 while the Jewish population had grown to over 550,000. There is much debate over whether a good part of the increase in the Arab population was due to the surge in economic activity brought on by the influx of Jews, but let’s leave that argument aside for the moment. A point that I made in another column about the Arab population of Palestine at the time when Israel was declared a state is that approximately 750,000 Arabs left what had been Palestine – but whether they left voluntarily or not was irrelevant to me. What was relevant to me, I emphasized, was that there could not have been a “Jewish” state with a majority Arab population.
I have heard nothing from those who would criticize the Nakba exhibit at the CMHR about that point.
Again – as I noted previously, I’m not arguing the morality of what happened to the Palestinians; I’m simply making the observation that Israel could not have come about had those 750,000 Arabs who did leave had chosen to stay. I don’t suppose my making that point makes one whit of difference to anyone who is criticizing the CMHR exhibit. I just wanted to reiterate my support for looking at what happened in 1948 objectively. And I’m well aware that even suggesting that one can be “objective” about such a contentious issue is up for debate – but can’t we even try for a little objectivity?
Finally, what about Jeffrey Epstein – and what’s he got to do with everything I’ve just written?
Well, it was the persistently nagging questions surrounding Epstein’s relationship with Trump that led directly to Trump deciding to join in with Netanyahu and attack Iran. Trump was desperate to “change the channel,” especially when so many of his diehard MAGA supporters kept asking questions about why Trump was so keen to put the Epstein issue aside. So now Trump is caught up in a war that he thought would divert attention from Epstein, but the most likely scenario is that he’ll end up trying to bring the war to a conclusion by ceding control over the Hormuz Strait to Iran and abandoning the notion of forcing Iran to give up its quest for a nuclear weapon. And if the only way to reduce Trump’s march toward total authoritarianism is to elect enough Democrats to at least take over the House of Representatives then what we’re going to see is a bunch of “woke” Democrats in Congress who will be wanting to end American support for Israel – and, they’ll be pushing for a Palestinian state.
Thank you, Jeffrey Epstein, for being the cause of this whole mess.
Features
35 years ago 14,000 Ethiopian Jews were rescued and brought to Israel in a short, but brilliant 36-hour operation
By BERNIE BELLAN My memory of an event that took place 35 years ago was jogged recently when I received an email from someone who himself was one of 14,000 Ethiopian Jews who were brought to safety in Israel during what was known as “Operation Solomon.”
That individual wrote that he wanted to thank me for articles I had written over the years, including about the rescue of Ethiopian Jews.
Here is part of what he wrote: “I am an Ethiopian Jew who live in Winnipeg. I recently came across Bernie Bellan’s articles and i was very fascinated by the depth of them and the fact they are informative and educational. I am not sure if he wrote anything about the thousands old dream of Ethiopian Jews who at the end reached their destination Israel. Thanks to operations Solomon and Moses that airlifted the Ethiopian Jews to become Israel’s citizens. I personally am grateful for the support i got from a couple of Jewish individuals in Winnipeg….My ancestors were hiding who they were in Ethiopia and i will never stop from telling who i am and my support for Israel. Please tell Bernie i said hello and i pray for his health so that he will continue sharing his knowledge. Little did he know that one day an Ethiopian Jew will read one of his articles.”
Reading that email led me to look back at articles that appeared in The Jewish Post & News around the time of Operation Solomon, also a later article that I wrote in 2013 about Israeli Brigadier General Eden Attias, who was deeply involved in Operation Solomon and who appeared at an event in Winnipeg that year.

I would be remiss, however, to write anything about Operation Solomon without mentioning the absolutely pivotal role that the late Professor Elliot Levine played in orchestrating support among some Winnipeg Jews to help in the rescue of Ethiopian Jews. I found two articles Levine had written around the time of that incredible rescue effort in which he described the clandestine work in which he – and several other Winnipeggers were involved in reaching out to Ethiopian Jews at a time when anyone in Ethiopia who openly announced they were Jewish put their lives in peril.
To begin with, here’s some background about what led to Operation Solomon – taken from my 2013 article about Israeli Brigadier General Eden Attias. General Attias had played a key role in Operation Solomon, including having been on the ground in Ethiopia during the actual rescue operation. He was introduced at that 2013 event by the late Yude Heneleff.
“Henteleff gave a brief overview of Operation Solomon: ”In 1991 the Ethiopian government was threatened with being toppled,’ explained Henteleff.
“For several years previous Israeli operatives had been secretly working in Ethiopia to procure the escape of as many ‘Falasha’ Jews as possible (whom Henteleff noted should be rightfully referred to as ‘Beth Israel’.)
“Concerned that a new government would put a stop to this ongoing exodus of Ethiopian Jews, the Israeli government decided to implement a bold plan to ferry out as many Jews as possible in a condensed period before the window of opportunity was closed.
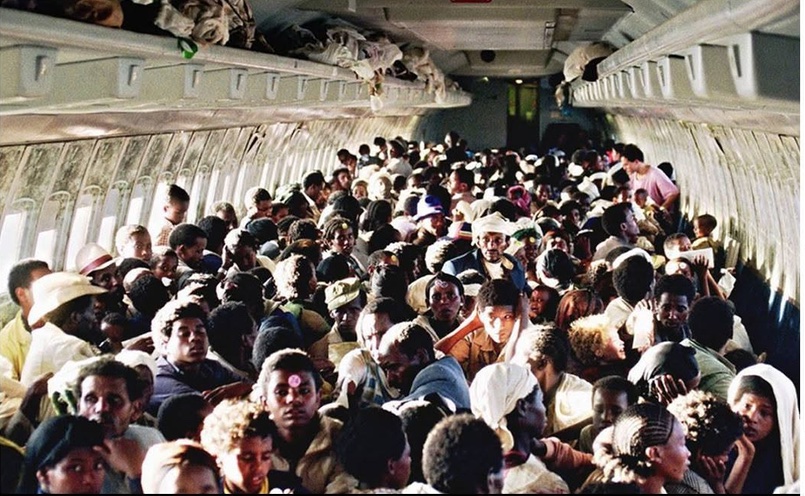
“Thus ‘Operation Solomon was born and carried out with precision. It involved the use of 34 aircraft, including several El Al passenger aircraft, as well as Israeli Air Force planes. In 36 hours the planes carried over 14,000 Ethiopian Jews to safety in Israel. In fact one Boeing 747 set the record for the most passengers ever transported on one aircraft when 1,122 passengers were crammed into the plane.
“During his talk Gen. Attias gave a detailed explanation of the events leading up to Operation Solomon, beginning as far back as 1862, when a group of Ethiopian Jews began the trek to Israel through the hostile territory of Sudan. Very few actually survived that journey, Attias noted.
“Through the years there had been various other attempts to bring Ethiopian Jews to Israel, with the most notable effort prior to Operation Solomon being ‘Operation Moses’, which was carried out in 1984. That operation was undertaken with the complicity of the Sudanese government and involved Mossad agents working to bring Ethiopian Jews to secret departure points in Sudan. Unfortunately members of the Israeli media learned of the operation and, even though they were asked to withhold revealing what they knew, went ahead and published details. That brought the operation to a sudden end, and with the rescue of only 7,000 Jews.”
Prior to Operation Solomon Ethiopia had been engulfed in a civil war that had contributed to mass starvation and brutal violence. In 1991 the Marxist regime that had been in power was threatened with being toppled and there was heightened concern within Israel – also in many communities in the diaspora, for the safety of Ethiopia’s Jewish population. As has already been noted, there had been other efforts to rescue Ethiopian Jews, but with mixed results. Thus, the bold plan to rescue as many Ethiopian Jews in one fell swoop was hatched. But in order to bring that rescue about contacts had to be made within the Ethiopian Jewish community.
How those many thousands of Ethiopian Jews were contacted is in itself a totally fascinating story. That’s where Elliot Levine’s description of the cloak and dagger nature of the work that was involved in making contact with those Jews was so vividly described in the two articles he wrote for us in 1991.
Levine noted that the vast majority of Ethiopian Jews – also known as “Falashas” (which is a derogatory term meaning stranger that was commonly applied to Ethiopian Jews by other Israelis) lived in Gondar province, which is in the north of Ethiopia.
As he wrote in the first of his articles describing the part that some Winnipeg Jews played in that rescue effort (published in the June 5, 1991 issue of The Jewish Post & News), “In April 1990 an agent if the American Association of Ethiopian Jews went into Ethiopia from North America….
“By May 1990 thousands of Ethiopian Jews had arrived in Addis Ababa with the help of a field worker placed by the American agent. A ‘truck stop’ outside of Gondar city was the rendezvous point. A few dollars a head paid for the road transport to the capital.
“By early June, however, an arrest had been made and a message had been sent out not to replace the field agent. Thereafter, those who made their way out of the hills had to make their own arrangements…
“With over 10,000 now in the capital (Addis Ababa), overburdened workers reported the weekly death tolls… By month’s end, emergency meetings and commitments had been made in Israel…
“In Winnipeg meanwhile, our Council of Rabbis was briefed on the situation and their response, among other things, funded an Ethiopian Jewish ‘agent’ we sent from Israel to assist families with particular problems.”
Levine went on to describe the invaluable assistance that agent played in helping Ethiopian Jews through “nighttime meetings, escorted tours that evaded security patrols and interviews with Ethiopian Jewish refugees.”
Levine noted, however, that the effort to help rescue Ethiopian Jews was organized entirely by a group of private individuals – with no assistance whatsoever from what was then the Winnipeg Jewish Community Council (later to become the Jewish Federation of Winnipeg). Further, the Committee for Ethiopian Jews – as the group was known, was an initiative led by members of Temple Shalom, Winnipeg’s Reform congregation.
At this point I want to return to that initial email I received from the Ethiopian Jewish individual who had reached out to me. In very dramatic fashion he described what happened when one father was approached by one of the agents who had been dispatched by the Israeli government to make contact with Ethiopian Jews and try to persuade them to flee their homes in Gondar:
“ ‘The silent call’ Operation Solomon
“ ‘good morning my name is …..i am here to tell you that we are on a mission to send a lot of people from Bet Israel( Ethiopian Jews) to Israel. And we know you are one of them. Are you interested’
“ ‘no I am not a Jew I went through horrible times I do not want to talk about myself and how would I know you are not a spy’
” ‘No I am not a spy please I know your family that is why I came to tell you about this mission’
“ ‘yes I am and please don’t tell anyone I am a Jew’
“This was a conversation that took place with the father of Anna and Jerusalem, 13 and 15 year olds who were sexually assaulted in front of their mother who took her own life the following day.
“That month in March 1991 preparation to evacuate 14000 Ethiopia Jews was planned secretly.
“In that same year 1991 bitter civil was raging in the Western part of Ethiopia, Just a month later the military junta was about to be overthrown.”
To return to Elliot Levine’s account of the role Winnipeg Jews played in the rescue of some Ethiopian Jews, in the follow-up article he wrote about that effort, he noted that Winnipeg Jews often responded quickly when told of specific urgent cases of individuals in need of direct help: “In the months preceding the airlift we had the luxury of responding to emergency appeals quickly….We in Winnipeg had arranged an especially prompt conduit – on most favourable terms. We also functioned as supporters of last resort for some of the inevitable cases that fell between the cracks. Recipients often confirmed receipt of our aid within a few days of our being notified of their plight.”
Ultimately, Operation Solomon helped rescue over 14,000 Ethiopian Jews in just 36 hours – from May 24-25, 1991. Non- stop flights of 35 Israeli aircraft were involved, including military and civilian planes. Almost all of Ethiopia’s Jewish population was rescued as a result.
